Hello everyone, in this post i will share that how to design custom footer in Median UI Template. We have been asked for this tutorial by many Median UI users. That’s why I am sharing this post.
Usually, a fairly simple footer is provided by default in the Median UI blogger template. Which many users do not like at all. That’s why we are sharing a tutorial on designing a custom footer. If you haven’t downloaded Median UI v1.6 yet, the link is given below, you can download this template.
This tutorial is only for Median UI v1.6 user. Please follow all the steps mentioned in the post and read this post till the end.
How to Add Custom Footer in Median UI v1.6 :-
/* Footer */ footer{font-size:97%;line-height:1.8em; padding:30px 0; border-top:var(--fotL) solid var(--contentL); color:var(--fotT); background:var(--fotB)} .cdtIn{display:flex;align-items:baseline;justify-content:space-between; position:relative;width:calc(100% + 20px);left:-10px;right:-10px} .cdtIn >*{margin:0 10px} .cdtIn .HTML{overflow:hidden;white-space:nowrap;text-overflow:ellipsis} .footCdt{display:inline-flex} .footCdt .creator{opacity:0} .tTop svg{width:20px;height:20px;stroke:var(--fotT)} .toTop{display:flex;align-items:center; white-space:nowrap} .toTop::before{content:attr(data-text); opacity:.7;margin:0 5px} .toTopF{display:flex;align-items:center;justify-content:center;width:45px;height:45px;border-radius:50%;background:var(--linkB);position:fixed;bottom:20px;right:20px} .toTopF svg{stroke:#fffdfc;stroke-width:2}
/* Footer */ footer{font-size:97%;line-height:1.8em; padding:30px 0; border-top:var(--fotL) solid var(--contentL); color:var(--fotT); background:var(--fotB)} .cdtIn{display:flex;align-items:baseline;justify-content:space-between; position:relative;width:calc(100% + 20px);left:-10px;right:-10px} .cdtIn >*{margin:0 10px} .cdtIn .HTML{overflow:hidden;text-overflow:ellipsis;width:91%} .footCdt{display:inline-flex;flex-direction:column;width:100%} .footCdt .creator{opacity:0} .tTop svg{width:20px;height:20px;stroke:var(--fotT)} .toTop{display:flex;align-items:center; white-space:nowrap} .toTop::before{content:attr(data-text); opacity:.7;margin:0 5px} .toTopF{display:flex;align-items:center;justify-content:center;width:45px;height:45px;border-radius:50%;background:var(--linkB);position:fixed;bottom:20px;right:20px} .toTopF svg{stroke:#fffdfc;stroke-width:2}
/*]]>*/</style>./* Custom Footer Css By Www.SmartTechMukesh.Com */
.footerContent{display:flex;margin-bottom:10px;}
.stmFooter-1{width:40%;margin-right:10px;}
.stmFooter-1 p{opacity:.8;font-size:12px;}
.stmFooter-1 .createBy{opacity:.8;}
.stmFooter-1 .footerName{font-size:23px;font-weight:700;}
.stmFooter-1 .footerName span{font-size:15px;font-weight:400;opacity:0.8;}
.stmFooter-1 .dmcaSample{font-size:9px;color:rgba(254,254,254,.6);border-radius:3px;overflow:hidden;line-height:30px;}
.stmFooter-1 .dmcaSample:before{content:'DMCA';padding:6px 10px;background-color:#2a2a2a;border-radius:4px 0 0 4px;}
.stmFooter-1 .dmcaSample:after{content:'Protected';color:#202442;padding:6px 10px;background-color:var(--linkC);border-radius:0 4px 4px 0;}
.stmFooter-1 .dmcaSample:hover{opacity:0.8;}
.stmFooter-2{width:60%;display:flex;}
.stmFooter-2 > *{width:33.333%;}
.stmFooter-2 ul{list-style:none;padding:0;}
.stmFooter-2 li{margin-bottom:10px;border-radius:3px;}
.stmFooter-2 li a{color:inherit;}
.stmFooter-2 li a:hover{color:var(--linkC);}
.drK .stmFooter-1 .dmcaSample:after{background:var(--darkU);}
.drK .stmFooter-2 li a{color:inherit;}
.drK .stmFooter-2 li a:hover{color:var(--darkU);}
@media screen and (max-width:640px){.footerContent{flex-direction:column;}.stmFooter-1{width:100%;margin-bottom:10px;margin-right:0;}.stmFooter-2{width:100%;}.cdtIn{flex-direction:column;align-items:flex-end;}}
<div class='footCdt'>.<div class='footerContent'>
<div class='stmFooter-1'>
<div class='createBy'><i class='far fa-edit'/> Created By</div>
<h3 class='footerName'>YourName <span> .domain</span></h3>
<p>All Posts are Protected By <b>DMCA</b>.<br/>Reproduction in Any Form is Strictly Prohibited!</p>
<a class='dmca-badge' href='#' target='_blank' title='DMCA.com Protection Status'><span class='dmcaSample'/></a>
</div>
<div class='stmFooter-2'>
<div class='colMt-1'>
<h3 class='title'>Partner</h3>
<ul>
<li><a href='#' target='blank'><i class='fal fa-angle-double-right'/> Link 1</a></li>
<li><a href='#' target='blank'><i class='fal fa-angle-double-right'/> Link 2</a></li>
<li><a href='#' target='blank'><i class='fal fa-angle-double-right'/> Link 3</a></li>
</ul>
</div>
<div class='colMt-2'>
<h3 class='title'>Contact</h3>
<ul>
<li><a href='#' target='blank'><i class='fal fa-angle-double-right'/> Link 1</a></li>
<li><a href='#' target='blank'><i class='fal fa-angle-double-right'/> Link 2</a></li>
<li><a href='#' target='blank'><i class='fal fa-angle-double-right'/> Link 3</a></li>
</ul>
</div>
<div class='colMt-3'>
<h3 class='title'>Powered</h3>
<ul>
<li><a href='#' target='blank'><i class='fal fa-angle-double-right'/> Link 1</a></li>
<li><a href='#' target='blank'><i class='fal fa-angle-double-right'/> Link 2</a></li>
<li><a href='#' target='blank'><i class='fal fa-angle-double-right'/> Link 3</a></li>
</ul>
</div>
</div>
</div>
</body>.<script>
//<![CDATA[
function loadCSS(e,t,s){"use strict";var a=window.document.createElement("link"),t=t||window.document.getElementsByTagName("script")[0];a.rel="stylesheet",a.href=e,a.media="only x",t.parentNode.insertBefore(a,t),setTimeout(function(){a.media=s||"all"})}loadCSS("https://pro.fontawesome.com/releases/v5.10.0/css/all.css"),loadCSS("https://cdnjs.cloudflare.com/ajax/libs/animate.css/3.5.2/animate.min.css");
//]]>
</script>
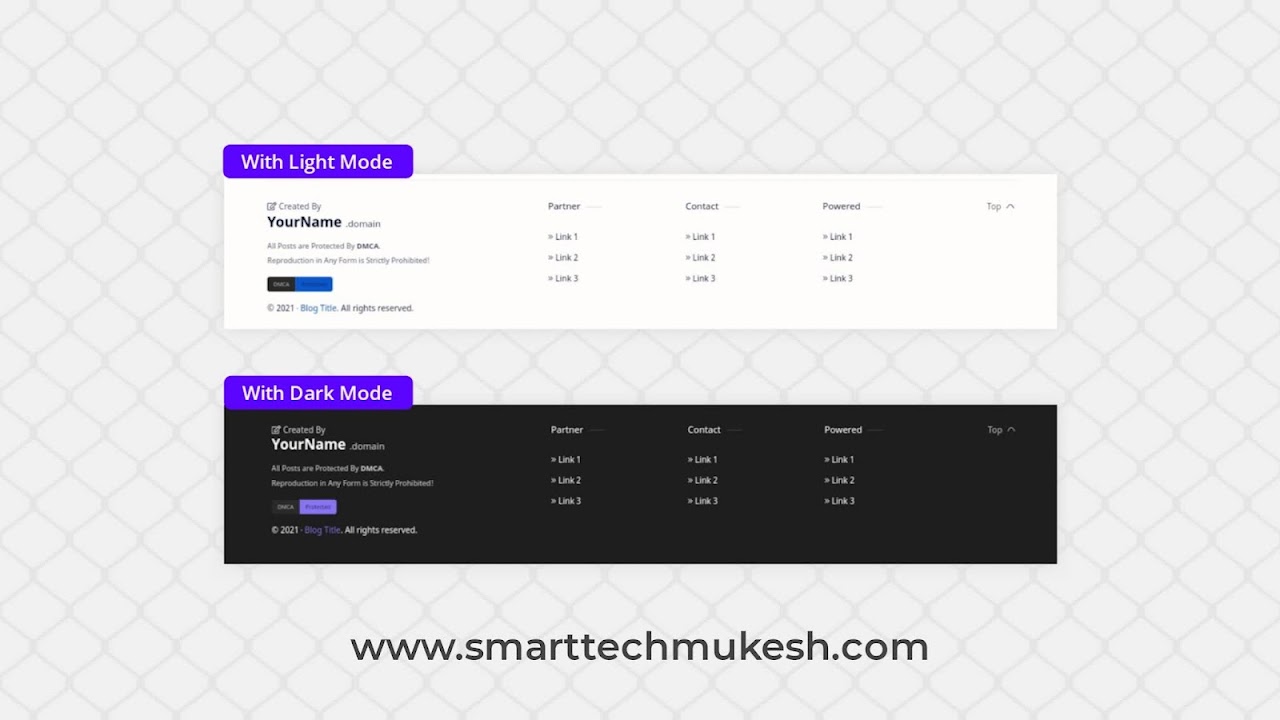
Preview Of Median UI v1.6 Custom Footer :-
I have checked the design of the footer using all this code. After that we have created this image preview. We could not give its web preview so we have given its image preview to show you all.
 |
| Source : www.smarttechmukesh.com |
Conclusion :-
We have shared for Median UI blogger template user how to create custom footer in template and all the code used in it. I hope this way to create custom footer in Median UI blogger template can be very useful for you and your blog. Thank you for visiting our website.
Refrence :
Www.SmartTechMukesh.Com


Thanks for the post brother
Welcome🎉
Great Post Mukesh ❤️😎
Osm bro
Working bro
Op
Super bro
Nice
Which Theme is This With Version
if You Can Then Send Backup Of Theme To Me Mail -: novoempire0@Gmail. com
OK Sir
Thanks Bro
I am Currently Used Median UI v1.6, So Buy Now This Template to Jago Desain Site. Or Free Available on Internet.
Thanks Bro
Tutorial to create a footer like the one you use.
tutorial to make a footer like the one you use bro.
Not spending superfluous words.
It is remarkable, a useful phrase